
As apartment renters, we often deal with the fact that we don’t have a
vivacious yard to host outdoor parties and gatherings. Instead, we settle
for the boring cement balconies that no one steps foot on. Why not turn this
wasted space into a delicious retreat that will surely have the neighbors
talking (but in a good way).
My love for pallets has now reached the outdoors
(who knows…maybe one day I may actually build an entire house out of
pallets…stay tuned). I got tired of looking at the grey cement and took it upon
myself to turn my balcony from drab to fab!

Here’s what you will need
- 8 Pallets (I called a local manufacturer and bought all 8 for $20 after telling the owner about my DIY project. The only other thing he required was pictures of the finished project J)
- Outdoor rug (Long enough to cover the entire surface of the balcony – I used an artificial turf rug to give the feeling of outdoor grass)
- Measuring tape
- Thompson’s water seal spray
- Outdoor paint (Whatever color you prefer for your décor taste and style)
- Paint brush
- Paint rollers
- Plastic tarp
- Poly-Fil NU-Foam® (Enough for the length and width of your pallet cushions…you might want to double this up for more comfort and cushion, which means double the amount of foam is needed)
- Outdoor fabric (Always over estimate…I would rather have more than not enough…the fabric will be folded over both the foam and the ply wood)
- Heavy duty stapler
- Heavy duty caster wheels
- Screws
- Drill
- Ply wood (The length and width of your pallets MINUS the depth of the back support!)
- Scissors
- Sand paper
- Balcony accessories (Flowers, grill, candles, rugs, etc.)

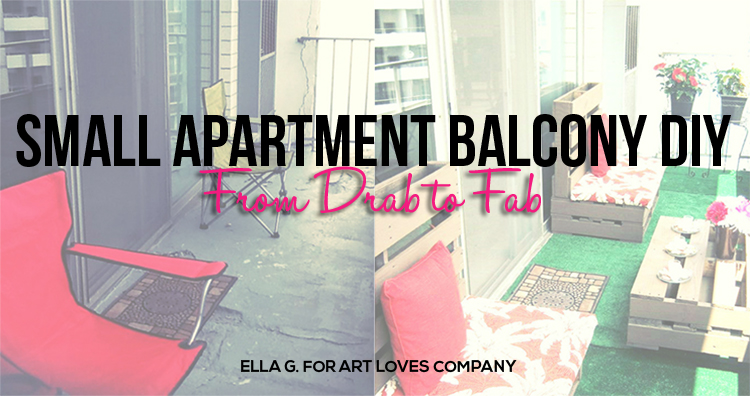
Exhibit A
This
boring cement ridden eye sore was in desperate need of a makeover. My apartment
was located right on the water on the 22nd floor with beautiful
views of the land and lake. The view out shined the balcony by far, but who
would want to sit on this to take in that gorgeous view? Not me…I would rather
look from the inside out…but that’s about to change!

Step 1
Lay
down the outdoor rugs and cut down to the length and width of the balcony using
your scissors. You have the option to secure this down, but I chose not to
since I will have 2 pallet benches and an outdoor coffee table among other
things to securely hold the outdoor rugs in place.

Step 2
Gather your wheel casters, screws and the drill. Drill the screws into the designated
holes on the wheel casters as shown above to secure them in place (make sure
that they are all facing the same direction on all 4 corners). This will serve
as our rolling coffee table. Having the one pallet might be a little too low
for you so therefore I used 2 pallets for the coffee table.

Step 3
Take
your water sealer and cover all your ply wood that will be used for the
cushions thoroughly. Let this sit for about an hour.

Step 4
While
your ply wood is drying, sand down your pallets. Go ahead and place one coat of
your outdoor paint in your desired color. Let that first coat sit while you
move on to building your cushions (I’m all about multi-tasking).


Step 5
Time
to make the cushions. So at this point our ply wood should be dry from the
water sealer. We need our foam, the ply wood, our outdoor fabric, scissors,
and stapler. Take the foam and cut the size of the ply wood (I would leave
about half an inch of foam around the edge of the ply wood). If you want more
cushioning, then double up your foam for extra sitting comfort.
Lay your fabric on the ground with the right
side facing the ground, then layer the foam and ply wood in the middle of the
fabric face down. At this point you should have a good 2 to 3 inches of fabric
all the way around the foam and ply wood. Take your heavy duty stapler and
staple the fabric to the ply wood all the way around. Repeat this again so that
you now have 2 comfy cushions for the benches.
Step 6
Now
that our cushions are built, set them to the side and place one more coat of
outdoor paint over the pallets thoroughly. Let the paint dry completely…we’re
almost there. J

Step 7
Stack your PAINTED pallets (2 on the bottom for the benches and one vertically
for the back support, and 2 for the coffee table). Ignore the fact that my
pallets are not painted. This is more to give you the general idea of how to
stack the pallets. As stated previously, one pallet for the coffee table will
not be enough, therefore, this is why it's best to use 2.
I decided
not to secure the back support based on my layout, however depending on where
you place your new pallet furniture, you may need to secure the back to the base
using a few screws and the drill. Drill the screws into where the back
support and the base overlap. Since my back support bumped up to the glass this
was more than enough support…plus if I wanted to change up the look,
I could do so with ease.
Step 8
Place your 2 cushions on the benches (if it overlaps a bit…no worries). Now it
is time to accessorize. Feel free to get creative for this step…just try to
stick to one theme.
Once you are
done, take a step back and admire your work!

You have now
turned your drab balcony into a fabulous retreat! ENJOY!

No comments:
Post a Comment